 Pin it
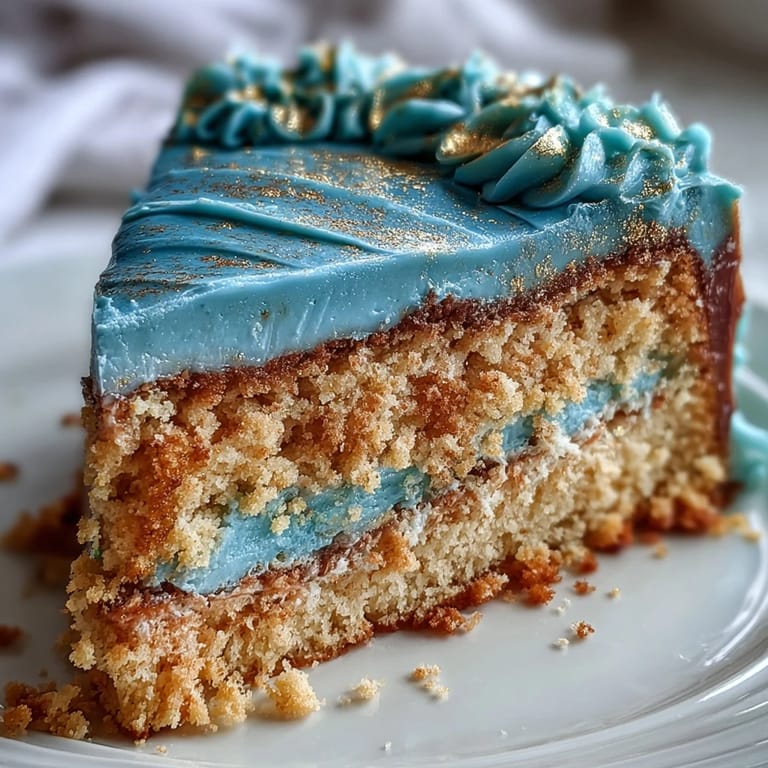
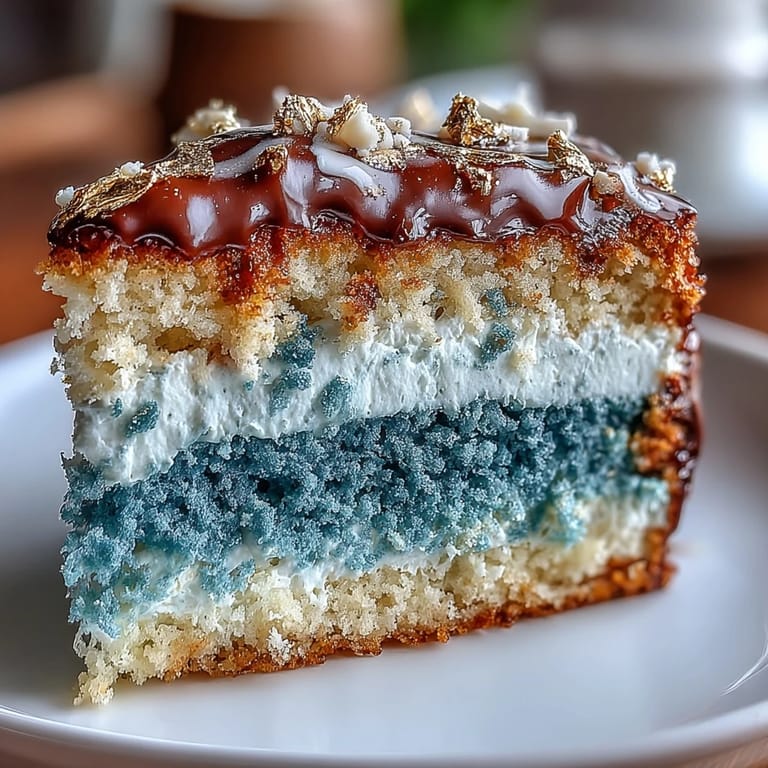
 The first time I tried my hand at an ombre cake was after hearing an eruption of laughter in the kitchen—my younger brother had managed to turn his birthday cupcakes green instead of blue. That playful chaos sparked an idea for this graduation cake: bold, layered color for a milestone day, but with a touch of elegance. The scent of vanilla and the shimmer of gold always remind me there's reason to celebrate, even while scraping the last bits of icing from the bowl. There's something magical about seeing deep blue transform to a lighter hue, promising both a striking visual and a subtle reminder of growth. This cake has become my go-to for moments that deserve a bit more sparkle.
I remember making this cake for my cousin's graduation—while we waited for the layers to cool, we joked about whose blue would have the best Instagram moment. It became less about perfection and more about laughter and the thrill of layering gold leaf onto buttercream. Even the little dash of gold dust felt significant, like sealing the achievement with edible confetti. Decorating together with family made the kitchen feel alive, full of anticipation and sweet scents. That memory sticks with me every time I prepare this recipe for any big event.
Ingredients
- All-purpose flour: Go for sifted flour for lighter layers—clumps can ruin the ombre effect, and I learned that the hard way.
- Baking powder and baking soda: These help the cake rise evenly; double-check freshness for a fluffy crumb.
- Salt: Just a pinch boosts flavor and balances the sweetness.
- Unsalted butter: Use room-temperature butter for easy creaming; cold butter can make the batter dense.
- Granulated sugar: The sweetness ties the vanilla and color together; beat it well with butter for an airy texture.
- Eggs: Room temperature eggs create smoother batter and help the layers stay moist.
- Pure vanilla extract: Quality vanilla enhances the cake's aroma—it’s worth splurging a bit.
- Whole milk: Add slowly, mixing on low speed to prevent splattering; don’t skip this for richness.
- Blue gel food coloring: Gel colors blend beautifully without thinning the batter—I use navy, royal, and light blue for a bold ombre effect.
- Powdered sugar: Sifting removes lumps, resulting in a smooth buttercream.
- Milk or cream: Adjust the amount to get the frosting just right—too much makes it runny, too little makes it hard to spread.
- Edible gold leaf or dust: Always check the packaging to ensure it’s safe for consumption, and handle with care—they’re fragile but transform the cake.
Tired of Takeout? 🥡
Get 10 meals you can make faster than delivery arrives. Seriously.
One email. No spam. Unsubscribe anytime.
Instructions
- Prep Your Cake Pans:
- Grease and line each pan with parchment, listening for the rustle as you press it flat—it makes the cakes easy to remove.
- Create the Blue Batter:
- When mixing flour and leavening, the powdery texture feels like clouds; blending butter and sugar sets the tone for lightness. Divide into bowls, swirling in shades of blue until you see a gentle ombre fade before baking.
- Bake and Cool:
- Watch for the cakes to rise and fill the kitchen with a vanilla smell; cooling on racks lets the layers become sturdy enough for stacking.
- Whip Up Buttercream:
- Beat butter till it’s pale and fluffy, then sift in powdery sugar for a cloud-like finish. Split and tint—one plain for crumb coat, the rest a deep blue for contrast.
- Assemble and Frost:
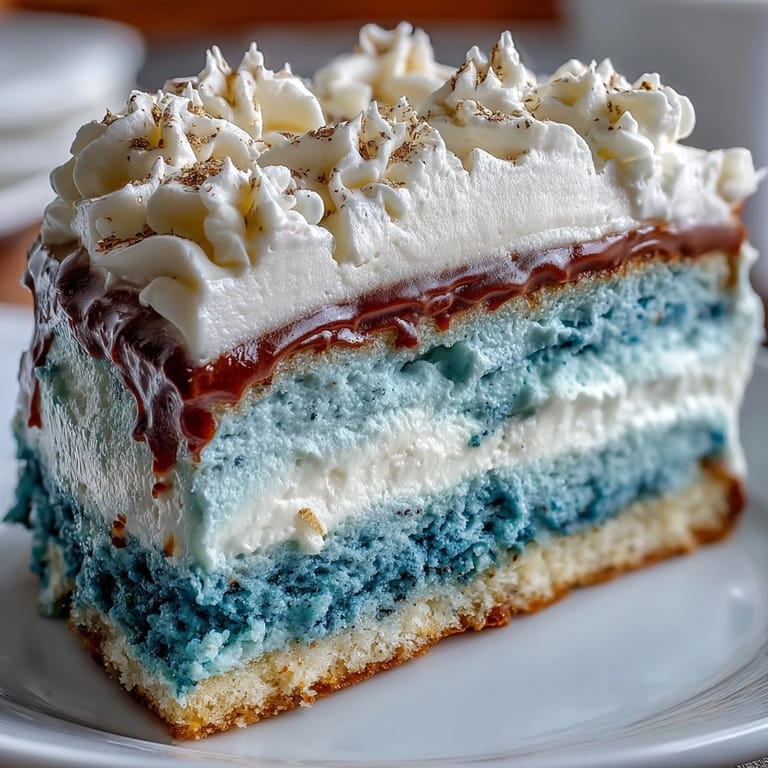
- Place the darkest layer first; add creamy buttercream between stacks. Apply crumb coat, chill, then finish with dark blue frosting blended upwards for ombre.
- Gold Finish:
- Delicately press gold leaf or brush gold dust along the sides—my favorite part, as it transforms the cake into a celebratory sculpture.
- Final Chill:
- Let the cake set in the fridge; each layer firms up so cutting gives beautiful slices with clean color lines.
 Pin it
 After assembling this cake for a graduation party, I watched a crowd pause before slicing—admiring the gold shimmer and the gradient blues. The moment felt bigger than the recipe, as friends recounted how the transitions between layers mirrored their new journey. For a second, it was less about dessert and more a symbol, and I’ll never forget that fleeting hush before celebration resumed. It made me realize how a cake can turn a gathering into an event. Even now, the sight of blue and gold together brings that feeling back.
How To Get Perfect Ombre Layers
To master ombre, start with the lightest blue, then gradually add more coloring for each layer. Mixing gently with a spatula prevents streaks, and watching the color deepen always feels satisfying. If you’re nervous about achieving even hues, test with a tiny spoonful before baking. Scraping down the sides of each bowl helps ensure uniform color. The layers look and taste best when baked together, so the gradient effect shines through when sliced.
Gold Decorating Tricks That Impress
Applying gold leaf takes patience—use tiny tweezers and let it flutter onto the buttercream, pressing lightly. If you're brushing gold dust, mix with a splash of vodka for smooth streaks without melting the frosting. Gold decorations never fail to catch the light and make every slice sparkle, especially for festive photos. I always make sure hands are clean and dry, as humidity can dissolve delicate gold. Don’t rush—taking your time results in those striking, elegant edges.
Staging and Serving for the Celebration
Position the cake on a turntable for easy decorating and impressive presentation. Serving after a brief chill ensures the gold stays in place and the layers hold together perfectly. Add graduation toppers, berries, or chocolate stars for an extra personal touch—guests notice the details. Pairing with apple cider or Prosecco enhances the celebratory mood.
- Cut slices with a sharp, warm knife for clean edges.
- Chill leftovers in airtight containers to preserve color and flavor.
- Remember: Always double-check that all decorations are food-safe before serving.
 Pin it
 May your graduation cake be as bold as the moment, and may every slice carry joy and pride into your celebration. If you ever find blue streaks on your apron, that’s just proof you made something memorable!
Recipe Questions & Answers
- → How do you achieve the ombre effect in the cake layers?
Divide batter into separate bowls and tint each with varying shades of blue gel coloring. Layer from darkest to lightest.
- → What is the recommended frosting for this cake?
Vanilla buttercream works best, providing creamy texture and stability for stacking and crumb-coating the layers.
- → How are the gold accents applied?
Edible gold leaf or gold dust mixed with clear alcohol can be brushed on in streaks or edges for a decorative finish.
- → Can I add extra layers for a more dramatic ombre effect?
Yes, adding four or five layers with increasing intensity of blue coloring enhances the visual impact significantly.
- → What serving suggestions complement this cake?
Pair with sparkling apple cider or Prosecco, and decorate with graduation toppers, chocolate stars, or fresh berries.
- → What allergens should I be aware of?
Contains wheat (gluten), eggs, milk (dairy). Check gold decoration labels for additional allergens.